How To Install A Cable Steering System On Your Boat? (2023)
Marine Tech Miami • March 4, 2023
If you're a boat owner, one of the most important tasks is ensuring that your boat's steering system is functioning correctly to ensure the safety of everyone onboard.
However, installing a cable steering system can be daunting, especially for those new to the boating world.
But fear not! In this blog post, we will guide you through the process step-by-step.
We'll cover everything from calculating the cable length to connecting the steering cables to the outboard bracket.
No matter your level of experience, our instructions and tips will help you install a cable steering system with ease and confidence.
By the end of this post, you'll know precisely what tools you'll need and how to get the job done right.
I. Calculating the length of the cable
When installing a cable steering system in your boat, one of the essential steps is determining the cable length you will need.
To get this measurement right, you must follow a few steps to ensure you have the correct cable length.
First, measure the distance between the steering wheel and the outboard motor.
This distance is often divided into three parts:
- The distance from the steering wheel to the dash
- The distance from the dash to the transom
- The distance from the transom to the outboard
Once you have these three measurements, you can add them together to get the total length of the cable that you will need.
This step is where you will need to use a bit of math to get it right.
For example, if your measurements are 5 feet, 4 feet, and 6 feet, the total length of your cable would be 15 feet.
After calculating the total length of the cable, you will need to factor in any 90-degree bends that the cable will need to navigate.
When the cable has to bend, it creates tension and strains the cable, which can cause it to wear down faster.
Therefore, it's crucial to subtract 10 centimeters (or approximately 4 inches) from the total length for every 90-degree bend in the cable's path.
Finally, to ensure that you have enough slack in the cable to accommodate any other factors, such as cable routing, you must add 20.5 centimeters (or approximately 8 inches) to your total length.
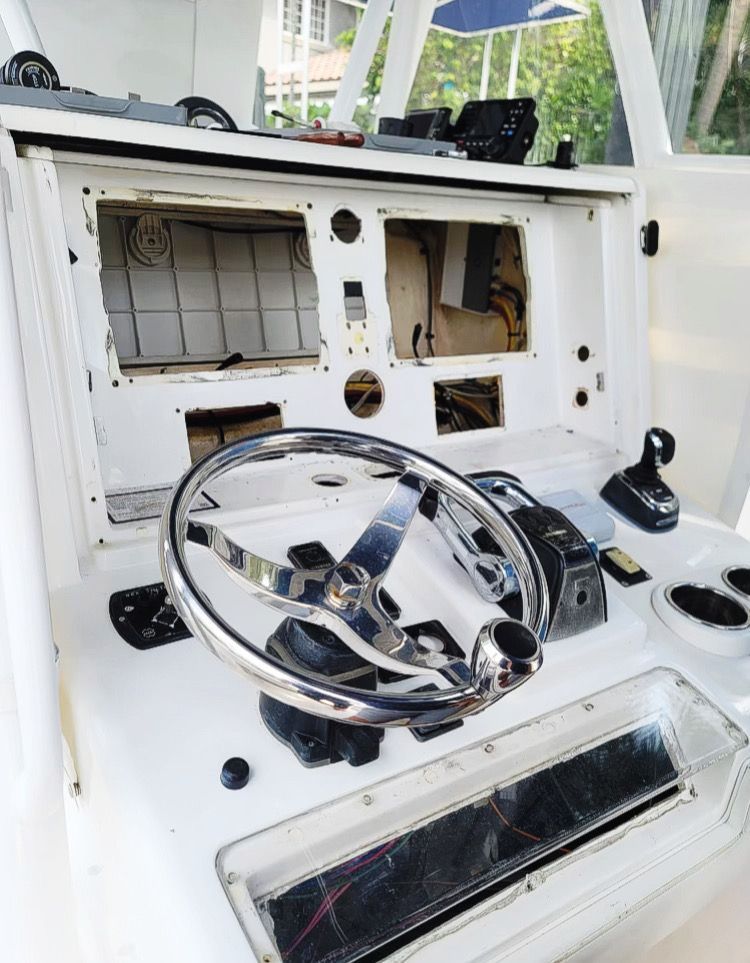
II. Fitting the cables to the helm
Installing a cable steering system in your boat requires fitting the cables to the helm.
The helm is the central component of your steering system, where the steering cables will connect to the steering wheel.
Here are the steps involved in fitting the cables to the helm:
- Temporarily attach the steering wheel. Before you begin to fit the cables to the helm, it's a good idea to secure the steering wheel to the helm temporarily. This makes it easier to fit the steering cables, as the wheel provides a larger surface area.
- Push the steering cable into the helm. The next step is to push the steering cable into the helm. You can do this by threading the line through the hole in the helm and pushing it in until it catches. Then, you can turn the wheel to pull the cable through the helm and out the other side.
- Lock the cable in place. Once the line is through the helm, you can use the provided bolt to lock it. Tighten the bolt securely, but be careful not to overtighten it, as this can damage the cable.
- Cover any exposed cable. Finally, you should cover any exposed cable with the supplied cover to prevent corrosion. Corrosion can be a significant problem for cables, especially in saltwater environments, and it can lead to reduced performance and even failure of the steering system. The cover will help protect the cable and ensure it lasts as long as possible.
III. Installation
Installing a cable steering system in a boat ensures a safe and functional steering system.
Here are the steps involved in installing the system:
- Cut the hole for the mounting bracket using the template included with the bezel kit.
This template will ensure the hole is appropriately positioned and cut to the correct size.
- Fix the mounting bracket in place using the provided nuts and bolts.
The bracket will provide a secure base for the steering helm.
- Use Duralac on the bolts to prevent electrolytic corrosion.
This type of corrosion can occur when dissimilar metals come into contact with each other and damage the bolts over time.
- Push the steering helm through the bracket and attach it with bolts.
The helm will be the central point of the steering system, and it's essential to ensure that it's securely attached to the boat.
- Screw the bezel cup onto the steering helm shaft.
The bezel cup will provide a finished look to the steering system and protect the helm from damage.
- Place the Woodruff Key into the slot on the helm shaft.
It ensures the steering wheel is aligned correctly with the helm and won't slip or move.
- Slot the steering wheel over the helm shaft and Woodruff Key.
Make sure that the wheel is aligned correctly with the helm before proceeding.
- Secure the wheel in place with the locknut and tighten thoroughly with a wrench.
Ensuring that the locknut is drawn correctly is essential, as a loose steering wheel can be dangerous and lead to losing control.
- Fix the trim cap over the steering wheel.
IV. Connection kit
The connection kit is the final step in installing a cable steering system in a boat.
This kit connects the steering wheel to the outboard motor, allowing the operator to control the boat's direction.
Here is a step-by-step explanation of how to install the connection kit:
- Lubricate the cable and tilt tube with water-resistant grease. This step ensures that the cable and tube move smoothly and helps prevent corrosion.
- Push the cable rod through the engine tilt tube and tighten the butt to hold it in place. The butt is a minor fitting that secures the cable to the engine. Please make sure the cable is tight enough so that it does not slip out of place.
- Confirm that the rod moves horizontally when the steering wheel is turned. This step ensures the cable is properly aligned and connected to the steering wheel.
- Bolt the connection kit to the end of the steering cable rod. The connection kit is a small piece that connects the cable to the outboard motor. Use the bolts provided in the kit to attach them securely.
- Bolt the other end of the connection kit to the bracket on the outboard. The bracket is typically located near the motor and holds the cable. Ensure the bolts are tight enough so the cable does not slip out of place.
- Confirm that everything is working correctly, and then tighten all bolts thoroughly. Once all the components are installed, test the steering system to ensure it works correctly. Turn the steering wheel and make sure the outboard motor responds accordingly. Once you are satisfied that everything is working correctly, use a wrench to tighten all the bolts thoroughly. Loose bolts can cause the cable to slip out of place and lose steering control.
Installing a cable steering system in a boat can be a complex process.
Still, following these steps carefully ensures that your steering system is installed correctly and functions properly, if something goes wrong, then make sure to talk to a professional.
And that's where we can help!
With more than 25 years of experience, our team has worked with every type of boat, from personal watercraft to mega yachts.
The Marine Tech team has the experience, quality, and warranty that you and your boat deserve.
We specialize in all types of marine electronics installation, and we can help get started with any upgrade you're thinking of doing to your vessel.
Contact us today for a free estimate!
Contact Us
Contact Us
Recent Posts
Upgrade your boat with South Florida’s premier installers. Expert dockside installation for JL Audio, Garmin navigation, Starlink for yachts, and Control4 automation
Ready to transform your boating experience with pristine audio, lightning-fast internet and automated control, contact local experts to book your consultation
Expert Garmin, JL Audio & Starlink installation in Miami. Onsite service in Ft. Lauderdale, Aventura, Coral Gables & Key Largo. Get a free quote.

Discover #1 Marine Tech Miami for marine electronics installation miami, Starlink Installation miami, garmin marine installers miami & JL audio marine miami. Serving Ft. Lauderdale to Key Largo Fl – free quotes!
CONTACT US
Looking to upgrade your marine electronics?
With more than 25 years of experience, we can help you get started today!